US US US We use cookies on this website to improve your shopping experience. We use cookies to remember log-in details and provide secure log-in, collect statistics to optimize site functionality, and deliver content tailored to your interests. Click accept to give your consent to accept cookies.
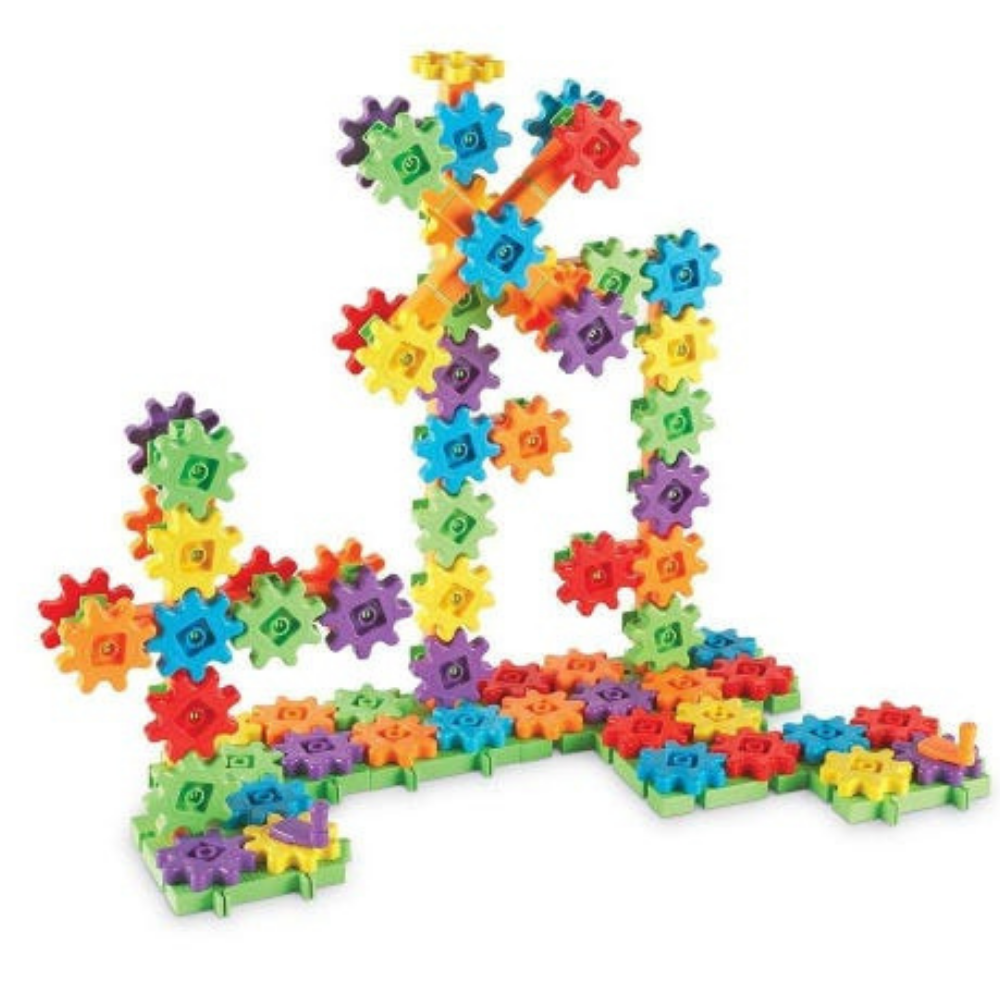
Hooray! The holidays are here! Time for snuggly sweaters, snowy sleigh rides, hot apple cider, and… STEM? Yes! Winter break is a great time to slip in some STEM learning and the Learning Resources Playground Engineering & Design Building Set is a great way to do it!
First, a quick refresher on STEM.
STEM is simply a nationwide push to put more emphasis on science, technology, engineering, and math in schools, to better prepare our kids for careers in these fields in the future. By exploring these subjects at home, in a playful, low-stress way, you’ll ignite your kids’ curiosity, fuel creative thinking, and problem-solving, and inspire confidence that will carry through to school and support what your kids are learning there.
So, what are you waiting for?
Pour a cup of cocoa, call the kids to the table, and get ready to build your own polar playground!
Open the box, and you’ll find lots of packaged parts and pieces, as well as a set of double-sided instruction cards and a little workbook. Start by unpacking all the pieces in groups and checking out the different playground equipment you and your kids can engineer! You’ll find posts, platforms, gears, connectors, and more – everything you’ll need to design your own simple machines!
Next, choose a card and review the pieces you’ll need to build that structure. Work together to gather them and set them aside. Then follow the photos on the cards to assemble the structure, piece by piece. Once it’s finished, test it out by placing one of the included figures inside.
Now, flip the card to find a building challenge related to that structure. This is a great time to introduce the engineering design process – you know, ask, imagine, plan, create, and improve. Let your little one take the lead on solving the problems on the back of each card – you’ll be impressed with their creative solutions!
Take your time building the different playground pieces. Talk about the process and share some of the science behind the fun. Gravity draws the figure down the inclined slide. Momentum keeps the merry-go-round spinning. You get the idea.
When you’re done with building fun, it’s time to get creative with some playground pretend play! Your kids will love walking the included figures through the playground and helping them try out each piece of equipment.
In fact, there are lots of playful ways to help your kids love learning and develop the skills they need for success. Work a holiday-themed puzzle, dissolve a candy cane, freeze and melt colored ice cubes… There are always ways to learn where you play – especially during the holidays!
The kids’ table is THE place to be this holiday. Allow time for the adults to enjoy seconds at the big table by breaking out some STEM fun with the kids. Mini marshmallow and gumdrop structures are this holiday’s time enhancer–and it couldn’t be easier!
Simple setup + simple materials = BIG scientific impact
You will need:
Lots of toothpicks
Gumdrops
Mini marshmallows
Without realizing it, your kids (and kid guests) will begin to think like engineers who are facing a two-part challenge:
What to make?
How to improve on what you’ve already made?
Begin by challenging kids to create simple structures, like shapes. Try octagons, triangles, ladders, etc. Will these serve as building blocks to something more three-dimensional?
Without the children realizing it, building these gumdrops and marshmallow shapes is a unique way to practice fine motor skills. Dexterity, grasp, and coordination are necessary to construct up, up, up – no matter the age!
Next, watch kids as they critically examine how to improve upon what they’ve already created. What step is needed to take it (literally) to the next level?
What about the structural composition of the connectors? As the kids begin to build, are the marshmallows easier to stab with the toothpick? Which seems to keep your three-dimensional shapes in place better?
As they build, remind children that failure is definitely an option, here. That your shape may shift and your tower may topple! The attempt to rebuild by lessons from their first misstep is just as important of a takeaway.
Lastly–and most delightful to watch as parents–might be the natural drive for table collaboration. “If we attach our structures together, it will be even bigger and better and more interesting!
The possibilities are endless (and so are the fun and laughs!).
There are so many fun new materials for little hands to explore at this time of year. One of my favorite quick-to-set-up activities is to provide my preschooler with a selection of festive loose parts, a few containers or cups, and some Learning Resources, Fine Motor Tools. The freedom to explore in her way always inspires so much creative play.
Christmas loose parts - jingle bells, mini bows, and mini presents (all from Dollar Tree)
The Set-Up
This couldn’t be any easier to set up; simply put the materials and fine motor tools in the container! I chose to color code the loose parts and containers as an added sorting element to the tinker box. It is worth noting that, of course, if your little one still mouths items, then avoid any small loose parts in your tinker box as they could be a choking hazard.
How the Activity Works
Tinker boxes or trays are simply an open-ended selection of materials that encourage your child to experiment and explore. There is no expected outcome or a particular way to play with the materials. Instead, the focus is more on your child having the opportunity to use each material however they wish. The really interesting thing is to see how your child combines the materials and uses them to drive their play.
When my 3-year-old opened the box, she gave the cutest little gasp. She was so excited to get her hands on all these loose parts without any restrictions.
Straight away, she set up some of the cups and started transferring materials. Moving the bells from one place to another may not seem like learning, but so many skills are being developed here.
She was working on her fine motor skills each time she moved a bell and used her senses to explore the materials and then develop a vocabulary to express what she was experiencing.
Adding fine motor tools to a setup like this helps extend the play by adding a different element of challenge. My little one experimented with if she could pick up the various loose parts with each tool. This offered an opportunity for some problem-solving.
For example, the presents were too big to fit inside the Squeezy Tweezers, so she had to switch to using the Jumbo Tweezers. She also realized after a while that she could fit more than one bell inside the Squeezy Tweezers, which made filling the cups with bells much faster!
Due to the fact that the set contained only three colors- red, green, and gold, there was lots of focused color sorting. This led in turn to an excellent opportunity to work on some counting skills.
As she filled the cupcake liners and cups, she would count the items in. She also then spent time comparing the group sizes of each color. This is such a great early numeracy link as phrases like bigger and smaller and more than and less than were often used.
Have you ever tried using a tinker box with your child? It’s so fascinating to see how they use the materials and combine them with their imaginative play ideas. Using Learning Resources fine motor tools is a great way to extend the play and add an extra challenge to transferring the materials. So much open-ended fun!
Print out these backgrounds and tape them inside a shoebox to create your very own winter fun! Or right-click on the image to save it to give your computer background a festive makeover!
Print out these backgrounds and tape them inside a shoebox to create your very own winter fun! Or right-click on the image to save it to give your computer background a festive makeover!
Whether you live in a climate where blizzards are common, or those little white flakes are rarely in your forecast, snow and all it entails is a holiday dream for all little minds.
Whether you live in a climate where blizzards are common, or those little white flakes are rarely in your forecast, snow and all it entails is a holiday dream for all little minds.
 Shop UK Site