US US US We use cookies on this website to improve your shopping experience. We use cookies to remember log-in details and provide secure log-in, collect statistics to optimize site functionality, and deliver content tailored to your interests. Click accept to give your consent to accept cookies.
Valentine's Pattern Block Activity is a fun and engaging way to incorporate math and problem-solving skills into the holiday. These activity mats feature different Valentine's Day-themed pictures, such as hearts, flowers, and cupids. To complete the activity, students can use pattern blocks to create the pictures on the mats.
This activity is a great way to teach kids about shapes, counting, sorting, reasoning, symmetry, and even fractions. Students will use pattern blocks to create the pictures on the mat, which will help them understand and recognize different shapes and combine them to create a complete picture. Additionally, students will need to count the number of pattern blocks required for each image; this will help to improve their counting abilities.
The activity also includes reasoning, symmetry, and fractions. Students must use their problem-solving skills to determine which pattern blocks to use and where to place them to create the desired picture. They will also practice symmetry by matching the pattern blocks to create a symmetrical picture. And finally, with pattern blocks, students can explore fractions and how they relate to the different shapes.
Valentine's Pattern Block Activity is a great way to incorporate math and problem-solving skills into the holiday while keeping the activity fun and festive. These simple Valentine's pattern Block Mats are an awesome math challenge for kids. Just print them out and start building; it's that easy!
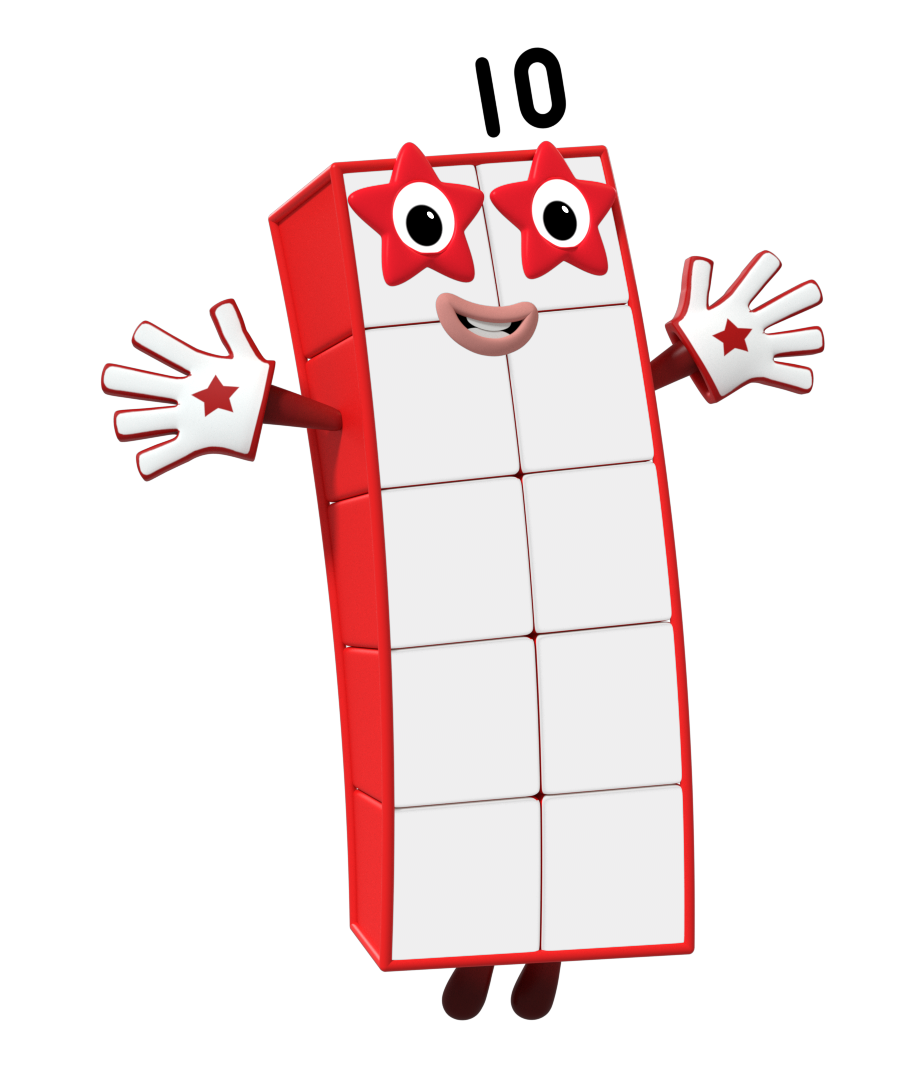
Mathlink Cubes are perfect for creating fun and engaging Valentine's Day themed math activities. Additionally, Mathlink Cubes can be used to create patterns and sequences, such as making a pattern of hearts and counting the number of cubes used. These activities will help students practice their math skills in a fun and festive way.
Mathlink Cubes are great for kids for several reasons:
Hands-on learning: Mathlink Cubes are a hands-on learning tool that children can physically manipulate and explore mathematical concepts. This can help to make math more engaging and interactive for students.
Multi-use: Mathlink Cubes can be used for various mathematical concepts, including counting, addition, subtraction, measurement, geometry, and more. This makes them a versatile and valuable tool for teachers and parents to have in their toolkits.
Develops fine motor skills: Using the Mathlink Cubes requires children to use their fine motor skills, which can help to improve dexterity and hand-eye coordination.
Concrete to abstract: Mathlink Cubes provide a concrete representation of mathematical concepts, which can help children to understand and internalize these concepts. Then the children can apply what they learned in the tangible form to more abstract problems.
Fun and engaging: Mathlink Cubes come in different colors, making math activities fun and engaging for children. The fun and colorful aspect of the cubes makes children more excited to learn and practice math.
Differentiation: Mathlink Cubes can be used to provide different levels of challenge for students, making it easy for teachers to differentiate instruction and provide support for students who need it.
Overall, Mathlink Cubes are an excellent tool for kids to learn and practice math in a fun and interactive way.
The kids’ table is THE place to be this holiday. Allow time for the adults to enjoy seconds at the big table by breaking out some STEM fun with the kids. Mini marshmallow and gumdrop structures are this holiday’s time enhancer–and it couldn’t be easier!
Simple setup + simple materials = BIG scientific impact
You will need:
Lots of toothpicks
Gumdrops
Mini marshmallows
Without realizing it, your kids (and kid guests) will begin to think like engineers who are facing a two-part challenge:
What to make?
How to improve on what you’ve already made?
Begin by challenging kids to create simple structures, like shapes. Try octagons, triangles, ladders, etc. Will these serve as building blocks to something more three-dimensional?
Without the children realizing it, building these gumdrops and marshmallow shapes is a unique way to practice fine motor skills. Dexterity, grasp, and coordination are necessary to construct up, up, up – no matter the age!
Next, watch kids as they critically examine how to improve upon what they’ve already created. What step is needed to take it (literally) to the next level?
What about the structural composition of the connectors? As the kids begin to build, are the marshmallows easier to stab with the toothpick? Which seems to keep your three-dimensional shapes in place better?
As they build, remind children that failure is definitely an option, here. That your shape may shift and your tower may topple! The attempt to rebuild by lessons from their first misstep is just as important of a takeaway.
Lastly–and most delightful to watch as parents–might be the natural drive for table collaboration. “If we attach our structures together, it will be even bigger and better and more interesting!
The possibilities are endless (and so are the fun and laughs!).
As they learn the basics of reading, writing, and math, your kids can use these toys to build new skills for kindergarten and beyond! When you give your kids toys from Learning Resources, you're giving them skills that last long after the holidays end!
Counting Surprise Party™
Unbox new counting and color skills in every surprise present! You never know what might be inside the presents of Counting Surprise Party from Learning Resources. Little ones will find a fun surprise toy within each colorful numbered box - from a little blue robot to a high-flying plane to a friendly teddy bear, and there are ten manipulative-style gifts in all that kids can wrap and rewrap and again. In addition to building new fine motor skills with every unboxing, they'll also build new skills in color and number recognition, whether they're sorting their toys by the colors on the boxes, counting up their stack of presents, or matching the dots on the present lids with the numerals printed on the boxes' fronts.
Solve brain-teasing puzzle challenges that test your knowledge of shapes, critical thinking, fine motor skills, and more! Four colors and patterns also boost recognition skills. Includes 24 shapes and double-sided challenge cards. Designed with solo play in mind, these puzzles are a great way to build essential logic and critical thinking skills!
Crack open a colorful gem surprise! Little ones get a no-mess introduction to sorting, matching, and counting with the play geodes and gems of Rock 'n' Gem Surprise from Learning Resources. Using the included play hammer and chisel, kids can crack open each reusable play geode and discover the translucent plastic gemstones inside. Gems double as manipulatives and come in eight different colors and four different shapes - you might find a red heart, a purple triangle, a green diamond, or more fun combinations. In addition to helping kids learn early sorting, matching, and counting skills, Rock 'n' Gem Surprise also introduces kids to early STEM and geology concepts without the messy clean-up associated with real rocks and geodes.
Build new elementary math skills one MathLink Cube at a time! Whether in the classroom or homeschool, students explore addition and subtraction, multiplication and division, geometry, and more with the fun math challenges found within the MathLink Cubes Elementary Math Activity Set from Learning Resources. Our most advanced counting cube activity set yet, this elementary educational toy pairs the popular hands-on math manipulatives with a fun set of challenges that grow with students' skills.
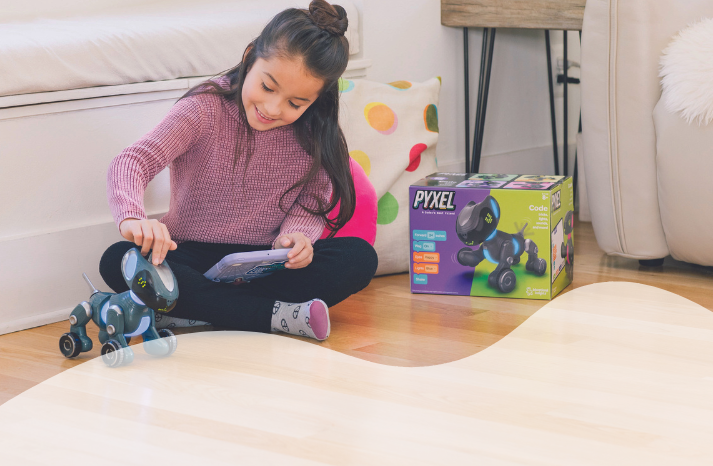
Botley 2.0 helps kids as young as 5 learn to code through 100% screen-free play. Botley 2.0 knows multiple ways to code right out of the box— code him to move in six directions, play music, and even put on a light show! Discover Botley 2.0’s 16 fun interactions— transform him into a train, police car, ghost, and more! You can even test your memory with the lights and sounds of a game of Botley Says!
As they learn the basics of reading, writing, and math, your kids can use these toys to build new skills for kindergarten and beyond! When you give your kids toys from Learning Resources, you're giving them skills that last long after the holidays end!
Counting Surprise Party™
Unbox new counting and color skills in every surprise present! You never know what might be inside the presents of Counting Surprise Party from Learning Resources. Little ones will find a fun surprise toy within each colorful numbered box - from a little blue robot to a high-flying plane to a friendly teddy bear, and there are ten manipulative-style gifts in all that kids can wrap and rewrap and again. In addition to building new fine motor skills with every unboxing, they'll also build new skills in color and number recognition, whether they're sorting their toys by the colors on the boxes, counting up their stack of presents, or matching the dots on the present lids with the numerals printed on the boxes' fronts.
Solve brain-teasing puzzle challenges that test your knowledge of shapes, critical thinking, fine motor skills, and more! Four colors and patterns also boost recognition skills. Includes 24 shapes and double-sided challenge cards. Designed with solo play in mind, these puzzles are a great way to build essential logic and critical thinking skills!
Crack open a colorful gem surprise! Little ones get a no-mess introduction to sorting, matching, and counting with the play geodes and gems of Rock 'n' Gem Surprise from Learning Resources. Using the included play hammer and chisel, kids can crack open each reusable play geode and discover the translucent plastic gemstones inside. Gems double as manipulatives and come in eight different colors and four different shapes - you might find a red heart, a purple triangle, a green diamond, or more fun combinations. In addition to helping kids learn early sorting, matching, and counting skills, Rock 'n' Gem Surprise also introduces kids to early STEM and geology concepts without the messy clean-up associated with real rocks and geodes.
Build new elementary math skills one MathLink Cube at a time! Whether in the classroom or homeschool, students explore addition and subtraction, multiplication and division, geometry, and more with the fun math challenges found within the MathLink Cubes Elementary Math Activity Set from Learning Resources. Our most advanced counting cube activity set yet, this elementary educational toy pairs the popular hands-on math manipulatives with a fun set of challenges that grow with students' skills.
Botley 2.0 helps kids as young as 5 learn to code through 100% screen-free play. Botley 2.0 knows multiple ways to code right out of the box— code him to move in six directions, play music, and even put on a light show! Discover Botley 2.0’s 16 fun interactions— transform him into a train, police car, ghost, and more! You can even test your memory with the lights and sounds of a game of Botley Says!
Your holiday guests will be delighted as they arrive to your doorstep on a cold night greeted by these frosty, glowing lanterns. Oh what fun it will be when they learn your little scientists created the evening’s entryway décor!
It goes without saying that these lanterns work best in freezing temperatures. Should you choose to use them to light your holiday table, make sure to place them in a bowl for when they begin to melt!
This experiment involves the change of matter from a liquid to a solid (and eventually back to a liquid).
You will need:
• Plastic red cups
• Smaller plastic cups that can fit inside
• Decorations - glitter pipe cleaners, craft pom poms, glitter, pine sprigs, etc.
• Water
• Tape
• Food coloring
• Candles (battery-operated is probably best)
Grab one of your red cups, and twist pipe cleaners up the length of the cup. This part requires some engineering inspiration and small hands. How do you get them to stay up? If you choose, add some craft pom poms. Working on the pom poms to stay suspended in the pipe cleaners also creates a unique challenge. Think!
Next, pull out a long piece of tape and attach it to one side of the cup near the lip. The tape will be the important piece that will hold down the second cup, so it doesn’t float. Basically, have the tape ready before you pour in the water.
Fill the cup about half full with water. Add a few drops of food coloring if you would like at this time.
Place the smaller cup into the bigger, red cup. Pour your water in between the two cups, so it fills until about a half inch below the rim. You’ll want to push down on the smaller cup the entire time because the goal is to have the two rims even with each other.
Secure your second cup in place with the tape.
Place in the freezer overnight.
When you are ready to place your lanterns out for all to enjoy, remove them from the fridge and give yourself about 5 minutes. This is the perfect time to discuss the scientific changes you observe.
• The water is now frozen.
• The frozen water has pushed the small cup up.
• The frozen water has perhaps even changed the shape of the outer cup.
Remove the inner cup with a little tug and turn the red cup upside down to shake out the ice lantern. Time is not on your side handling the frozen lanterns, as they will melt quickly.
Showcase them with a battery-operated candle any place around the house where you’d like to wow your guests!
Who doesn’t love a good snow globe? Each one is a spellbinding combination of swirling, swishing liquid, and falling glitter that is perfect for sensory play. As mesmerizing as they are, did you know that snow globes are actually an experiment regarding the scientific principle of viscosity?
Let’s apply the standard of viscosity by creating a Snowman Snow Globe. We’ll put it together and then explain why it works.
You will need the following:
A water bottle (a clear glass water bottle was used here)
Clear glue
Tap water
Glitter
Black tape for the snowman’s top hat
Markers, paper, and pipe cleaners to make the snowman face
Craft items for the “floaters” inside the globe, like snowflakes, stars, buttons, or jingle bells
First, let’s get our snow globe looking like a snowman. Using a sharpie marker, draw on the eyes and buttons.
Second, you can draw on the carrot nose, but we used leftover orange sticky craft paper here.
Next, select a pipe cleaner to tie around under his carrot nose for a little scarf.
The man needs a top hat, right? Wrap the cap in black tape for his hat.
Now that he’s dressed and ready to go, squirt the clear glue into the bottle. We added more glue to one of our bottles. Will more thick glue make the glitter move slower or faster?
Next, sprinkle in your glitter and drop in the items that will float.
Now it’s time to watch the snow fly!
So what does viscosity mean for the snow globe?
The viscosity of a fluid is its relative “thickness.” Think of glue or maple syrup. Both are thick and slow. Viscosity is measured by its resistance to a stress factor. In the case of our snow globe, the stress is the water and shaking motion. Compared to the water, it is much thicker, slowing the fall of our glitter, snowflakes, and jingle bells.
The snow globe we made with less glue moved the objects much faster through itself. Less viscosity = easier movement of objects.
I’m sure by now you have heard about how beneficial “STEM activities” are for children, but many of you may be wondering what that means or entails. STEM activities are anything that promotes curiosity and growth in the areas of science, technology, engineering, and math.
Although those topics may sound pretty advanced for a preschooler or young child, there are many easy ways to incorporate a love for these concepts in the early years! Curiosity, creativity, collaboration, and critical thinking are at the heart of STEM! These are traits that the youngest child can be encouraged to explore.
One fun topic that we’ve been interested in lately is coding! I would have never imagined that my three and 5-year-old would be excited about something that I thought was so complex, but boy was I wrong. Their fascination began when we started playing with various imaginative play toys to teach them coding, our favorite being Botley the Coding Robot. They were instantly intrigued by the reactions that resulted from the commands they typed in!
I loved watching their little minds click as they realized that each command change would create a different outcome. To foster their new love for this concept, I began providing additional screen-free activities to help them become better at following patterns and various steps. Here is a fun, holiday-themed coding activity you can easily create for your little one.
Coding Candy Canes!
Supplies Needed for Coding Candy Canes
Pipe cleaners, pony beads, paper, and markers. Cut each pipe cleaner into three pieces and bend them into a candy cane shape. Next, select the colors or beads that you want to use. I recommend 2-3 colors for younger children, but you could use as many as you wish for an older child. Because the activity was for both of my daughters, I chose only red and green.
Putting it together
Lastly, take your paper and draw various candy canes on it, adding colored “bead dots” with your markers in the patterns or order you want your child to mirror.
Provide your child with pipe cleaner candy canes, beads, and paper. Ask them first to sort the beads into different color piles. Then, instruct them to create candy canes that match the ones on the paper. My girls loved this activity, and we hung the finished candy canes around our playroom as festive décor.
So there you have it: an inexpensive, low-prep, and screen-free way to introduce coding to your child! I hope that you found this informative and that it sheds some light on just how fun and easy STEM activities can be.
 Shop UK Site