US US US We use cookies on this website to improve your shopping experience. We use cookies to remember log-in details and provide secure log-in, collect statistics to optimize site functionality, and deliver content tailored to your interests. Click accept to give your consent to accept cookies.
Let's bid farewell to Summer in style by creating tie-dye beach towels with the help of the color wheel, rainbow order, mixing, and pigment strength. Set up the activity in the comfort of your backyard, and don't forget to grab some gloves and plastic coverings if you aren't on grass.
This activity works best with the widely available spray tie-dye kits. They dry faster, making the application easier for even the youngest beach-goers.
Grab white beach or bath towels (the fluffier, the more color-absorbent), lots of duct tape, hot water for mixing the tie-dye, and the spray kit.
Lay your towel out on a flat surface, smoothing it out. Spell out your child’s name across the towel using the tape and moving slowly.
Make it a Learning Experience
Keep the color wheel handy as a guide. It is a great visual tool for classifying spectral wavelengths from red to violet.
Depending on the options available in the tie-dye set you’ve purchased, look at your color wheel and separate your bottles into primary, secondary, and tertiary categories.
Next, put on your gloves on a covered surface or grass and mix the tie-dye with the warm water. What colors are made from primary colors? Working from the color wheel, which colors will look best near each other on the towel?
Let the Fun Begin
With those gloves on, let the spraying begin! Be glad you have on gloves! The bottles can get messy fast. If you prefer the traditional route of tie-dying, try using Twisty Droppers! Pigment strength was brought up: how do we intensify the color?
It’s perfectly fine to get spray on the tape. Once the towel is pretty dry, flip it over to spray the backside! Flip back over and allow to dry completely. Wash the towels separately twice, alone in the wash.
The Benefits
Creativity: Tie-dyeing allows children to express creativity through color and pattern choices. They can experiment with combinations and see how they turn out, encouraging them to think outside the box and develop their artistic skills.
Fine Motor Skills: This activity involves handling small objects, such as bottles and droppers, which can help children develop fine motor skills and hand-eye coordination.
Science Exploration: Tie-dyeing also teaches children about science concepts like color mixing and pigment strength. They can observe how primary colors combine to create secondary and tertiary colors and experiment with different dye ratios to water to create varying degrees of color intensity.
Sense of Achievement: Completing a project, such as tie-dyeing a beach towel, can give children a sense of accomplishment and pride in their work. They can use their monogrammed towels as a tangible reminder of their creativity and hard work.
Bonding Experience: This activity can also be an excellent opportunity for parents and children to bond over a shared creative project, working together to create a unique and personalized item that they can enjoy using for years to come.
Voilà! Monogrammed beach towels created by your color-wheel-savvy children. Enjoy the summer!
Valentine's Pattern Block Activity is a fun and engaging way to incorporate math and problem-solving skills into the holiday. These activity mats feature different Valentine's Day-themed pictures, such as hearts, flowers, and cupids. To complete the activity, students can use pattern blocks to create the pictures on the mats.
This activity is a great way to teach kids about shapes, counting, sorting, reasoning, symmetry, and even fractions. Students will use pattern blocks to create the pictures on the mat, which will help them understand and recognize different shapes and combine them to create a complete picture. Additionally, students will need to count the number of pattern blocks required for each image; this will help to improve their counting abilities.
The activity also includes reasoning, symmetry, and fractions. Students must use their problem-solving skills to determine which pattern blocks to use and where to place them to create the desired picture. They will also practice symmetry by matching the pattern blocks to create a symmetrical picture. And finally, with pattern blocks, students can explore fractions and how they relate to the different shapes.
Valentine's Pattern Block Activity is a great way to incorporate math and problem-solving skills into the holiday while keeping the activity fun and festive. These simple Valentine's pattern Block Mats are an awesome math challenge for kids. Just print them out and start building; it's that easy!
Mathlink Cubes are perfect for creating fun and engaging Valentine's Day themed math activities. Additionally, Mathlink Cubes can be used to create patterns and sequences, such as making a pattern of hearts and counting the number of cubes used. These activities will help students practice their math skills in a fun and festive way.
Mathlink Cubes are great for kids for several reasons:
Hands-on learning: Mathlink Cubes are a hands-on learning tool that children can physically manipulate and explore mathematical concepts. This can help to make math more engaging and interactive for students.
Multi-use: Mathlink Cubes can be used for various mathematical concepts, including counting, addition, subtraction, measurement, geometry, and more. This makes them a versatile and valuable tool for teachers and parents to have in their toolkits.
Develops fine motor skills: Using the Mathlink Cubes requires children to use their fine motor skills, which can help to improve dexterity and hand-eye coordination.
Concrete to abstract: Mathlink Cubes provide a concrete representation of mathematical concepts, which can help children to understand and internalize these concepts. Then the children can apply what they learned in the tangible form to more abstract problems.
Fun and engaging: Mathlink Cubes come in different colors, making math activities fun and engaging for children. The fun and colorful aspect of the cubes makes children more excited to learn and practice math.
Differentiation: Mathlink Cubes can be used to provide different levels of challenge for students, making it easy for teachers to differentiate instruction and provide support for students who need it.
Overall, Mathlink Cubes are an excellent tool for kids to learn and practice math in a fun and interactive way.
As a mom at home, hosting my son’s class party, and as a teacher, I LOVE weaving elements of STEM into holiday activities and parties. Valentine’s day is the perfect opportunity to engage your kiddos in sweet and simple hands-on science activities disguised as seasonal fun. Keep reading for easy-to-do, engaging activities that are sure to please even Cupid himself!
The key to each of these suggested activities is that they are super simple and most likely can be created with materials you already have in your home or classroom, or can be purchased at any discount or dollar store. Also, these activities are super flexible. You’ll see in the examples below that most of the activities have alternative ingredients or process steps. This is your FREE PASS because basically, you can’t mess these up, and you and your kids will love every minute!
LOVE POTION #9
Experiment with and observe buoyancy and states of matter by seeing how different types of Valentine’s Day candy react with carbonated liquids! This love potion will leave heads spinning and hearts pounding!
MATERIALS:
Alka-Seltzer original and water, clear soda (i.e. Sprite), or club soda (plain)
Clear cups
Valentine’s Day candy (Conversation Hearts, heart-shaped Red Hots, sprinkles, etc.)
DIRECTIONS:
Set out one clear cup.
Drop candy pieces into the cup (one type of candy per each cup.)
If you are using Alka Seltzer and water, fill the cup with water and drop it into a tablet. If you are using soda of some sort, fill the cup with the soda.
Watch to see if/when candy pieces float, bounce, and dance inside the cup.
You may need to add more carbonated liquid to see if that changes activity inside of the cup.
Make notes, write observations, and draw conclusions.
NOTES:
Keep extra Alka-Seltzer tablets and/or soda on hand to add if candies do not bounce/float. If using Alka-Seltzer, use minimal water at first and add water as necessary.
CANDY COATED CRUSH
Candy is a fabulous ingredient for science experiments, and we all know Valentine’s Day has candy a plenty. Try some of these instant options for Valentine’s Day candy light refraction and solubility experiments that are crowd-pleasers, but simple to set up and execute.
MATERIALS:
Assorted Valentine’s Day candy (Suggested: clear red heart suckers, Conversation Hearts, heart-shaped Red Hots)
Clear cups
Water
Flashlight (optional)
THAT’S IT!
ACTIVITY #1 (LIGHT REFRACTION) DIRECTIONS:
Place a sucker in an EMPTY clear cup.
Draw how the sucker looks in the empty cup.
Place a sucker in a half-full clear glass of water.
Draw how the sucker looks in the water-filled cup.
You may want to also try shining a flashlight through and around the candy in the water to test and document the changes (if any) in light refraction with the addition of the flashlight.
Make notes, write observations, and draw conclusions.
ACTIVITY #2 (SOLUBILITY) DIRECTIONS:
Set out one cup for each type of candy you’re using.
Fill each cup ½ to ¾ full with water.
Place one type of candy in each cup.
Check on the status of each cup/candy each 30-60 minutes.
Make notes, write observations, and draw conclusions.
POP ROCKS PUPPY LOVE
These crazy little candies are as great for science experiments as they are for eating! You can use the Pop Rocks and soda as substitutes for baking soda and vinegar in the experiment listed above, or try something totally new using the directions below, courtesy of Steve Spangler Science!
MATERIALS:
Pop Rocks (try to find multiple flavors; Valentine’s Day versions are available)
Balloons (I’m going to use HEART-SHAPED balloons for Valentine’s Day flair!)
Funnel
2 16 oz. bottles of soda (the greater soda variety, the better)
DIRECTIONS:
For a full demonstration of this amazing experiment in chemical reactions from Steve Spangler Science, click the image below to watch an informational video.
I can’t wait to see how much my Cupid Kiddos love these sweetheart STEM Valentine’s Day challenges! Try them out at home or in the classroom and comment to let us know sweet and simple Valentine’s Day STEM activity was your favorite!
Combining sensory play and art is one of our favorite ways to get creative. This star-themed craft will appeal to kids who love water play and making beautiful masterpieces!
With an activity like this, it’s always good to be proactive and avoid too much mess. I used a large silicone craft mat but then also had a deep oven pan to color the stars in. To prepare the materials I simply added water to the small pots and tore the bleeding tissue paper into small pieces (3 of each color). It really helps to have the Jumbo Eyedroppers in the stand for easy access and minimal mess.
How the Activity Works
The first stage of the activity involves inviting your child to add the pieces of bleeding tissue paper to the small pots of water- one color in each pot. The process of scrunching up the paper, dropping it in the water, and then using the toothpicks to squish the color out of the paper, is so much sensory and fine motor fun. As we did this, we spoke lots about the different colors, using descriptive words, and asking each other questions to stimulate the conversation.
After my little one had finished coloring her water, she picked out the pieces of bleeding tissue and got a blank coffee filter star ready. To add color to the white star she simply used the matching color Jumbo Eyedropper and squirted on the colored water. She loved seeing the color being absorbed by the star and gave out the cutest little gasps as it spread.
It was great to see my preschooler naturally experimenting with color mixing. She watched as the colors slowly seeped into one another and made new colors. Again, this was good for her sensory confidence and also her vocabulary. It is so important to keep the conversation freely flowing and to ask simple prompt questions during activities like this. For example, I would say to her ‘do you know what will happen if you squirt yellow on top of the blue’? You’ll be amazed at how much additional learning can happen through activity discussions with kids.
The Jumbo Eyedroppers are perfectly designed for little hands. The large handle means that the child has to engage those all-important fine motor muscles to transfer the water in and out of the tip. It is great that a fun hands-on activity like this can lend itself to building the hand strength needed for writing further down the line!
Once all three stars had been filled with the color we left them to dry on some kitchen towel. But the play was not yet over! My daughter continued to play with the water in the pots and oven pan for a long time! She mixed all of the leftover colors together and just enjoyed the simple act of filling, emptying, and refilling the pots… over and over again! What’s your favorite way to combine sensory play and art? We’d love some more ideas to try!
Ever wondered what to do with those fun puffy peanuts you get in packages? We were inspired by prekinders.com to set up this melting snowmen activity, but we added an extra STEM twist by using some of our favorite Learning Resources scientific tools and turning it into an investigation.
Tray along with one large bowl and three small bowls
Water
Permanent markers (we used acrylic paint markers, but Sharpies will also work)
The Set Up
I love using these simple lunch trays from Dollar Tree for little investigations like this. I put out the tools, small bowls (two filled with water), and the large bowl on the tray. This helps to keep the materials neatly organized and gives the child a defined workspace. To turn the packing peanuts into little snowmen I used acrylic paint markers to draw on the eyes, nose, scarf, and buttons. They turned out pretty cute! I then put the snowmen in the third bowl on the tray.
How the Activity Works
I invited my 3 yr old to come and have a look at what was on the tray. Her first reaction was to fuss over how cute and little the snowmen were! She was very intrigued by them. I then asked a very simple question to start the investigation. I asked her whether she thought that adding water to the snowmen would make them melt or not. She went back and forth on her answer, at one point wondering if they might actually float on the water. She finally decided that she thought they would melt.
It was time to find out if she was right. She took her first snowman and put it in the big bowl. She then used the dropper to gradually add water. She got so excited when the snowman began to melt! It started as little holes but soon enough the markings were floating in the water and the snowman was a pile of mush!
I encouraged her to use the magnifying glass to take a closer look at the snowman, and I asked her to describe what she could see. Even though she is only 3, I think it is such a great opportunity to encourage her to develop fundamental scientific language through play activities like this. She was also exploring lots of great sensory vocabulary as well.
She proceeded to add more of the snowmen to the bowl, also adding more and more water each time. She enjoyed using the Jumbo Tweezers to try and pick up parts of the snowmen. She kept apologizing to them each time they fell apart in her grasp!
This was a great activity for working her fine motor skills, as well as her sensory exploration. She was constantly using the tools to transfer the water and pick up the melted snowmen. Strengthening those little hand muscles through hands-on learning like this is such a great way to prepare your child for writing, without them even realizing it.
She spent ages at the end trying to salvage tiny parts of the snowmen, pouring water from bowl to bowl. Transfer activities have always appealed to her, but the added intrigue of the melting snowmen gave this a really fun scientific twist. We are looking forward to doing it again but next time I will ask her to try and draw her own little snowmen as well.
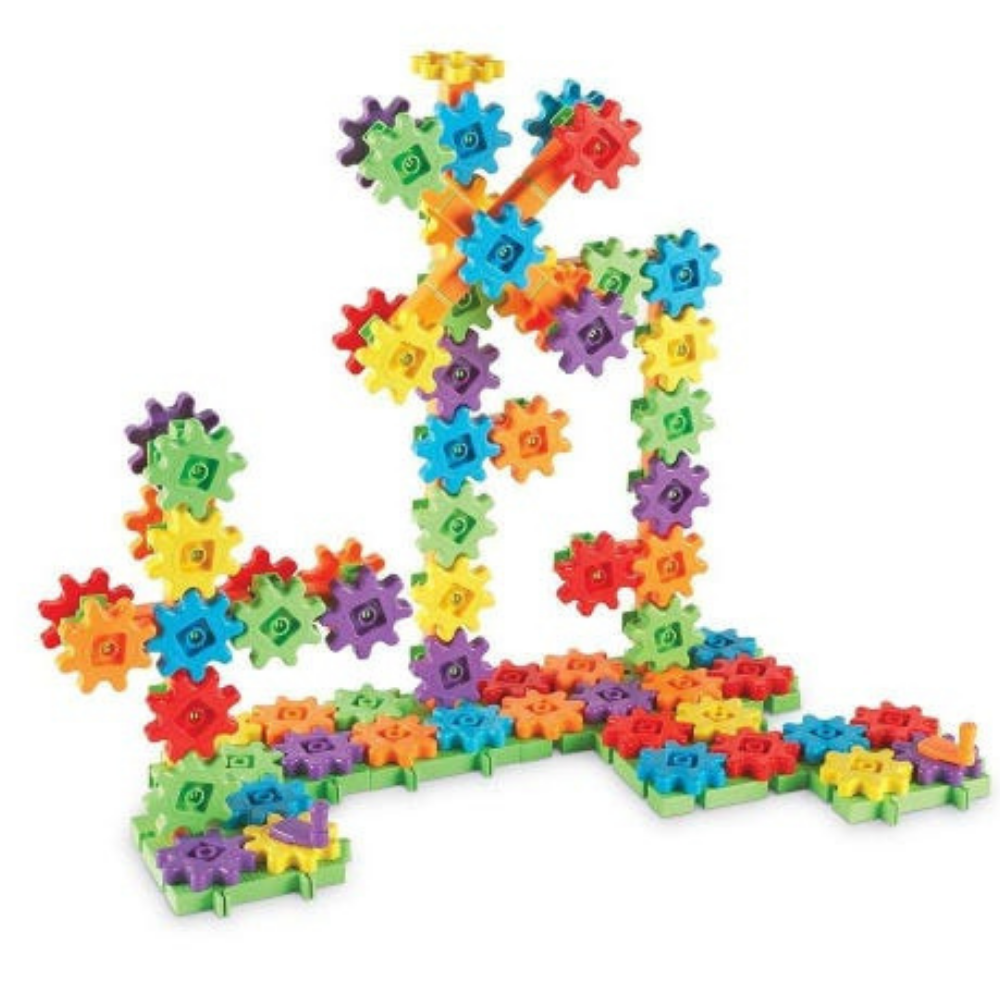
Hooray! The holidays are here! Time for snuggly sweaters, snowy sleigh rides, hot apple cider, and… STEM? Yes! Winter break is a great time to slip in some STEM learning and the Learning Resources Playground Engineering & Design Building Set is a great way to do it!
First, a quick refresher on STEM.
STEM is simply a nationwide push to put more emphasis on science, technology, engineering, and math in schools, to better prepare our kids for careers in these fields in the future. By exploring these subjects at home, in a playful, low-stress way, you’ll ignite your kids’ curiosity, fuel creative thinking, and problem-solving, and inspire confidence that will carry through to school and support what your kids are learning there.
So, what are you waiting for?
Pour a cup of cocoa, call the kids to the table, and get ready to build your own polar playground!
Open the box, and you’ll find lots of packaged parts and pieces, as well as a set of double-sided instruction cards and a little workbook. Start by unpacking all the pieces in groups and checking out the different playground equipment you and your kids can engineer! You’ll find posts, platforms, gears, connectors, and more – everything you’ll need to design your own simple machines!
Next, choose a card and review the pieces you’ll need to build that structure. Work together to gather them and set them aside. Then follow the photos on the cards to assemble the structure, piece by piece. Once it’s finished, test it out by placing one of the included figures inside.
Now, flip the card to find a building challenge related to that structure. This is a great time to introduce the engineering design process – you know, ask, imagine, plan, create, and improve. Let your little one take the lead on solving the problems on the back of each card – you’ll be impressed with their creative solutions!
Take your time building the different playground pieces. Talk about the process and share some of the science behind the fun. Gravity draws the figure down the inclined slide. Momentum keeps the merry-go-round spinning. You get the idea.
When you’re done with building fun, it’s time to get creative with some playground pretend play! Your kids will love walking the included figures through the playground and helping them try out each piece of equipment.
In fact, there are lots of playful ways to help your kids love learning and develop the skills they need for success. Work a holiday-themed puzzle, dissolve a candy cane, freeze and melt colored ice cubes… There are always ways to learn where you play – especially during the holidays!
The kids’ table is THE place to be this holiday. Allow time for the adults to enjoy seconds at the big table by breaking out some STEM fun with the kids. Mini marshmallow and gumdrop structures are this holiday’s time enhancer–and it couldn’t be easier!
Simple setup + simple materials = BIG scientific impact
You will need:
Lots of toothpicks
Gumdrops
Mini marshmallows
Without realizing it, your kids (and kid guests) will begin to think like engineers who are facing a two-part challenge:
What to make?
How to improve on what you’ve already made?
Begin by challenging kids to create simple structures, like shapes. Try octagons, triangles, ladders, etc. Will these serve as building blocks to something more three-dimensional?
Without the children realizing it, building these gumdrops and marshmallow shapes is a unique way to practice fine motor skills. Dexterity, grasp, and coordination are necessary to construct up, up, up – no matter the age!
Next, watch kids as they critically examine how to improve upon what they’ve already created. What step is needed to take it (literally) to the next level?
What about the structural composition of the connectors? As the kids begin to build, are the marshmallows easier to stab with the toothpick? Which seems to keep your three-dimensional shapes in place better?
As they build, remind children that failure is definitely an option, here. That your shape may shift and your tower may topple! The attempt to rebuild by lessons from their first misstep is just as important of a takeaway.
Lastly–and most delightful to watch as parents–might be the natural drive for table collaboration. “If we attach our structures together, it will be even bigger and better and more interesting!
The possibilities are endless (and so are the fun and laughs!).
Whether you live in a climate where blizzards are common, or those little white flakes are rarely in your forecast, snow and all it entails is a holiday dream for all little minds.
Whether you live in a climate where blizzards are common, or those little white flakes are rarely in your forecast, snow and all it entails is a holiday dream for all little minds.
 Shop UK Site


 MATERIALS:
 NOTES:
Keep extra Alka-Seltzer tablets and/or soda on hand to add if candies do not bounce/float. If using Alka-Seltzer, use minimal water at first and add water as necessary.
NOTES:
Keep extra Alka-Seltzer tablets and/or soda on hand to add if candies do not bounce/float. If using Alka-Seltzer, use minimal water at first and add water as necessary.
 MATERIALS:
 MATERIALS: