US US US We use cookies on this website to improve your shopping experience. We use cookies to remember log-in details and provide secure log-in, collect statistics to optimize site functionality, and deliver content tailored to your interests. Click accept to give your consent to accept cookies.
Celebrate Cinco de Mayo this year with some live music! The kids will love crafting these simple instruments, opening up discussion about the holiday and its origins. It is a common misconception that Cinco de Mayo is celebrated as Mexico’s independence day. In Mexican culture, May 5 actually marks the Mexican army’s unlikely victory over the French forces of Napoleon III in 1862, at the Battle of Puebla. In fact, the residents of the state of Puebla are really the ones who celebrate the holiday the most – even more than the rest of Mexico. They party with traditional Mexican food, dancers, and mariachi music. These wonderful sounds of celebration inspired us to make some homemade instruments. According to the Brain and Creativity Institute at University of Southern California, music experiences in childhood can actually accelerate brain development, particularly in language and reading skills. Down the road, learning a musical instrumental at an early age can actually improve mathematical learning and increase SAT scores. Sounds good to us, so let’s get musical! Here’s what you’ll need to make you own little Cinco de Mayo band.
Festive
Tambourine
What You'll Need:
2 paper or plastic plates
Decorations (stickers, markers, or paint)
Ribbon
Hole Punch
Craft Jingle Bells
Scissors
Using your paint or stickers, decorate the outside of your tambourine. Be colorful and creative!
Next, match the plates up so the bottom part of the plate faces out. Punch 5-6 holes around the plate’s circumference, making sure your bottom and top plates match up.
Cut the ribbon as long as you’d like. Longer ribbons always seem to add more drama! Then lace the ribbon through the jingle bells.
Loop your ribbon around the holes punched in the plates, securing it with a double knot.
Shake away! These small bells make a joyful sound!
Beating Drum
What You'll Need:
Clean Tin Can (be aware of sharp edges!)
Baloon
White Duct Tape
Decorative Tape
Two #2 Pencils
Scissors
First, cut the balloon at the base of the “stem”. You’ll need lots of balloon material to cover the wide opening of the can.
Stretch the balloon over the tin can. Tape the perimeter.
Then finish the whole can with the white tape, and add decorative tape if you so choose.
Shaky Maracas
What You'll Need:
Plastic Easter Eggs
Plastic Spoons
Dry Rice
White Duct Tape
Decorative Tape
Scissors
Fill the plastic eggs with about 2-3 pinches of rice. Filling them too full will not allow for the fullest sound: less is more.
Close the eggs and stick some tape around them immediately. If these crack open, you’ll have a big mess.
Next, situate two of the spoons to “cup” the eggs on either side. Wrap the tape around the spoon. Follow the spoons’ handles down with tape, as well as the top of the egg.
Add some decorative tape or stickers of your liking.
This is the time of year to be grateful, not wasteful. Used wrapping paper can tend to pile up during this special season of gift giving. Who amongst us hasn’t looked at a trash bag full of giftwrap and shook their head? There’s got to be a better use for all the paper, right? Below are a few clever ideas to get the kids involved in upcycling used gift wrap.
MYOB: Make Your Own Bunting. A delightful holiday design trend for several years now, bunting can be placed around the house to spruce up your season. Cut up your old wrapping paper in triangles using a template, tape it to a string, and have the kids come up with clever phrases, adding some deck to your halls.
Insist Your Toddler Cut Corners. For the toddler set, a whopping pile of paper and a pair of safety scissors is like heaven on Earth. Getting your preschooler practicing this important fine motor skill with all your leftover gift wrap. The paper is thinner, which might spark some cutting confidence. Pile it all up in a sensory bin and let them have at it!
A Little “Thank You” Goes a Long Way. So many presents, so many people to thank! Utilize the season’s remaining wrapping paper by having your kids fashion the cutest homemade thank you cards. This is a great busy activity in the dog days of winter break (you’ll thank us later).
A Place (setting) for Everything… Upcycle wrapping paper to create festive placemats for your holiday table. Not only will your tablescape showcase some extra holiday cheer, clean up will be a snap!
Winter Break Weaving. Paper weaving is a fun activity suitable for many age levels. Shred your remaining wrapping paper into strips. Using an x-acto knife, cut slits into construction paper. Be sure to do this step over an old magazine or cardboard. Weave the strips in and out of the slits. Use the creation for thank you cards, decoration, placemats, or anything where around the house that could use a little extra holiday style.
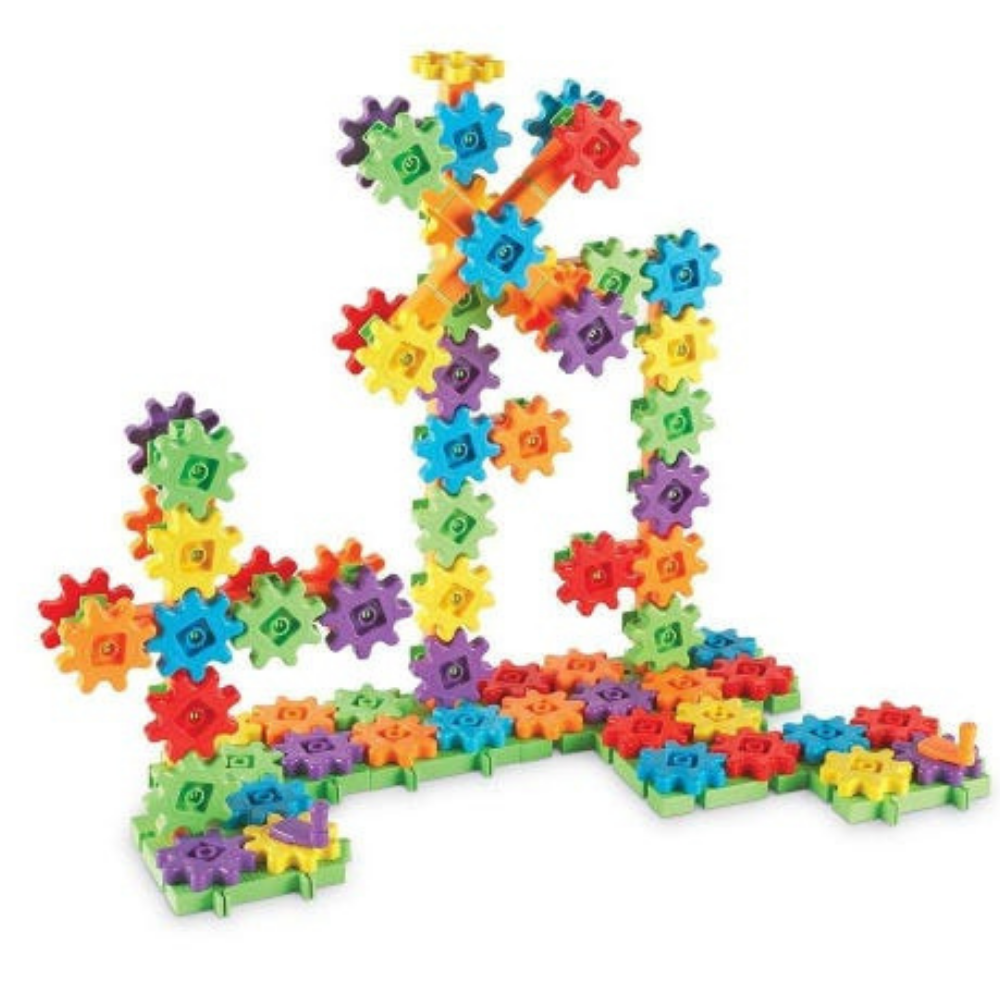
Hooray! The holidays are here! Time for snuggly sweaters, snowy sleigh rides, hot apple cider, and… STEM? Yes! Winter break is a great time to slip in some STEM learning and the Learning Resources Playground Engineering & Design Building Set is a great way to do it!
First, a quick refresher on STEM.
STEM is simply a nationwide push to put more emphasis on science, technology, engineering, and math in schools, to better prepare our kids for careers in these fields in the future. By exploring these subjects at home, in a playful, low-stress way, you’ll ignite your kids’ curiosity, fuel creative thinking, and problem-solving, and inspire confidence that will carry through to school and support what your kids are learning there.
So, what are you waiting for?
Pour a cup of cocoa, call the kids to the table, and get ready to build your own polar playground!
Open the box, and you’ll find lots of packaged parts and pieces, as well as a set of double-sided instruction cards and a little workbook. Start by unpacking all the pieces in groups and checking out the different playground equipment you and your kids can engineer! You’ll find posts, platforms, gears, connectors, and more – everything you’ll need to design your own simple machines!
Next, choose a card and review the pieces you’ll need to build that structure. Work together to gather them and set them aside. Then follow the photos on the cards to assemble the structure, piece by piece. Once it’s finished, test it out by placing one of the included figures inside.
Now, flip the card to find a building challenge related to that structure. This is a great time to introduce the engineering design process – you know, ask, imagine, plan, create, and improve. Let your little one take the lead on solving the problems on the back of each card – you’ll be impressed with their creative solutions!
Take your time building the different playground pieces. Talk about the process and share some of the science behind the fun. Gravity draws the figure down the inclined slide. Momentum keeps the merry-go-round spinning. You get the idea.
When you’re done with building fun, it’s time to get creative with some playground pretend play! Your kids will love walking the included figures through the playground and helping them try out each piece of equipment.
In fact, there are lots of playful ways to help your kids love learning and develop the skills they need for success. Work a holiday-themed puzzle, dissolve a candy cane, freeze and melt colored ice cubes… There are always ways to learn where you play – especially during the holidays!
The kids’ table is THE place to be this holiday. Allow time for the adults to enjoy seconds at the big table by breaking out some STEM fun with the kids. Mini marshmallow and gumdrop structures are this holiday’s time enhancer–and it couldn’t be easier!
Simple setup + simple materials = BIG scientific impact
You will need:
Lots of toothpicks
Gumdrops
Mini marshmallows
Without realizing it, your kids (and kid guests) will begin to think like engineers who are facing a two-part challenge:
What to make?
How to improve on what you’ve already made?
Begin by challenging kids to create simple structures, like shapes. Try octagons, triangles, ladders, etc. Will these serve as building blocks to something more three-dimensional?
Without the children realizing it, building these gumdrops and marshmallow shapes is a unique way to practice fine motor skills. Dexterity, grasp, and coordination are necessary to construct up, up, up – no matter the age!
Next, watch kids as they critically examine how to improve upon what they’ve already created. What step is needed to take it (literally) to the next level?
What about the structural composition of the connectors? As the kids begin to build, are the marshmallows easier to stab with the toothpick? Which seems to keep your three-dimensional shapes in place better?
As they build, remind children that failure is definitely an option, here. That your shape may shift and your tower may topple! The attempt to rebuild by lessons from their first misstep is just as important of a takeaway.
Lastly–and most delightful to watch as parents–might be the natural drive for table collaboration. “If we attach our structures together, it will be even bigger and better and more interesting!
The possibilities are endless (and so are the fun and laughs!).
Your holiday guests will be delighted as they arrive to your doorstep on a cold night greeted by these frosty, glowing lanterns. Oh what fun it will be when they learn your little scientists created the evening’s entryway décor!
It goes without saying that these lanterns work best in freezing temperatures. Should you choose to use them to light your holiday table, make sure to place them in a bowl for when they begin to melt!
This experiment involves the change of matter from a liquid to a solid (and eventually back to a liquid).
You will need:
• Plastic red cups
• Smaller plastic cups that can fit inside
• Decorations - glitter pipe cleaners, craft pom poms, glitter, pine sprigs, etc.
• Water
• Tape
• Food coloring
• Candles (battery-operated is probably best)
Grab one of your red cups, and twist pipe cleaners up the length of the cup. This part requires some engineering inspiration and small hands. How do you get them to stay up? If you choose, add some craft pom poms. Working on the pom poms to stay suspended in the pipe cleaners also creates a unique challenge. Think!
Next, pull out a long piece of tape and attach it to one side of the cup near the lip. The tape will be the important piece that will hold down the second cup, so it doesn’t float. Basically, have the tape ready before you pour in the water.
Fill the cup about half full with water. Add a few drops of food coloring if you would like at this time.
Place the smaller cup into the bigger, red cup. Pour your water in between the two cups, so it fills until about a half inch below the rim. You’ll want to push down on the smaller cup the entire time because the goal is to have the two rims even with each other.
Secure your second cup in place with the tape.
Place in the freezer overnight.
When you are ready to place your lanterns out for all to enjoy, remove them from the fridge and give yourself about 5 minutes. This is the perfect time to discuss the scientific changes you observe.
• The water is now frozen.
• The frozen water has pushed the small cup up.
• The frozen water has perhaps even changed the shape of the outer cup.
Remove the inner cup with a little tug and turn the red cup upside down to shake out the ice lantern. Time is not on your side handling the frozen lanterns, as they will melt quickly.
Showcase them with a battery-operated candle any place around the house where you’d like to wow your guests!
Who doesn’t love a good snow globe? Each one is a spellbinding combination of swirling, swishing liquid, and falling glitter that is perfect for sensory play. As mesmerizing as they are, did you know that snow globes are actually an experiment regarding the scientific principle of viscosity?
Let’s apply the standard of viscosity by creating a Snowman Snow Globe. We’ll put it together and then explain why it works.
You will need the following:
A water bottle (a clear glass water bottle was used here)
Clear glue
Tap water
Glitter
Black tape for the snowman’s top hat
Markers, paper, and pipe cleaners to make the snowman face
Craft items for the “floaters” inside the globe, like snowflakes, stars, buttons, or jingle bells
First, let’s get our snow globe looking like a snowman. Using a sharpie marker, draw on the eyes and buttons.
Second, you can draw on the carrot nose, but we used leftover orange sticky craft paper here.
Next, select a pipe cleaner to tie around under his carrot nose for a little scarf.
The man needs a top hat, right? Wrap the cap in black tape for his hat.
Now that he’s dressed and ready to go, squirt the clear glue into the bottle. We added more glue to one of our bottles. Will more thick glue make the glitter move slower or faster?
Next, sprinkle in your glitter and drop in the items that will float.
Now it’s time to watch the snow fly!
So what does viscosity mean for the snow globe?
The viscosity of a fluid is its relative “thickness.” Think of glue or maple syrup. Both are thick and slow. Viscosity is measured by its resistance to a stress factor. In the case of our snow globe, the stress is the water and shaking motion. Compared to the water, it is much thicker, slowing the fall of our glitter, snowflakes, and jingle bells.
The snow globe we made with less glue moved the objects much faster through itself. Less viscosity = easier movement of objects.
 Shop UK Site